Stark AT for Android Documentation
Version: 2.0.1
The purpose of this document is to provide the user with details related to the Stark Android handheld application. Please refer to the web console help section, "AT Mobile Help" for a complete overview of the mobile application. The underlying core functionality between AT Mobile and AT For Android has remained the same. New features found in the beta Android build may be found below.
Components:
- HTC Android Device
- TSL 1128 Bluetooth UHF RFID Reader
How to pull files off of the Android device:
- Plug the HTC Android device into a computer via micro-USB cable.
NOTE: Android sync drivers will need to be installed on the computer. The user will see a message similar to the one below:
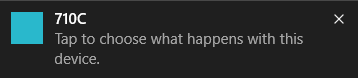
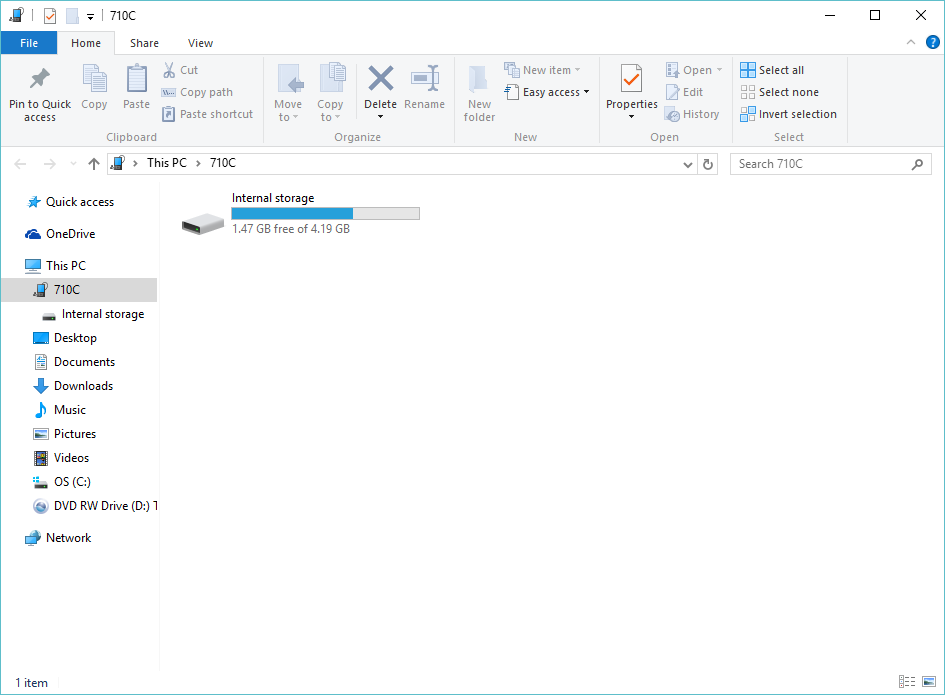
- Click on the message. A file explorer window will launch.
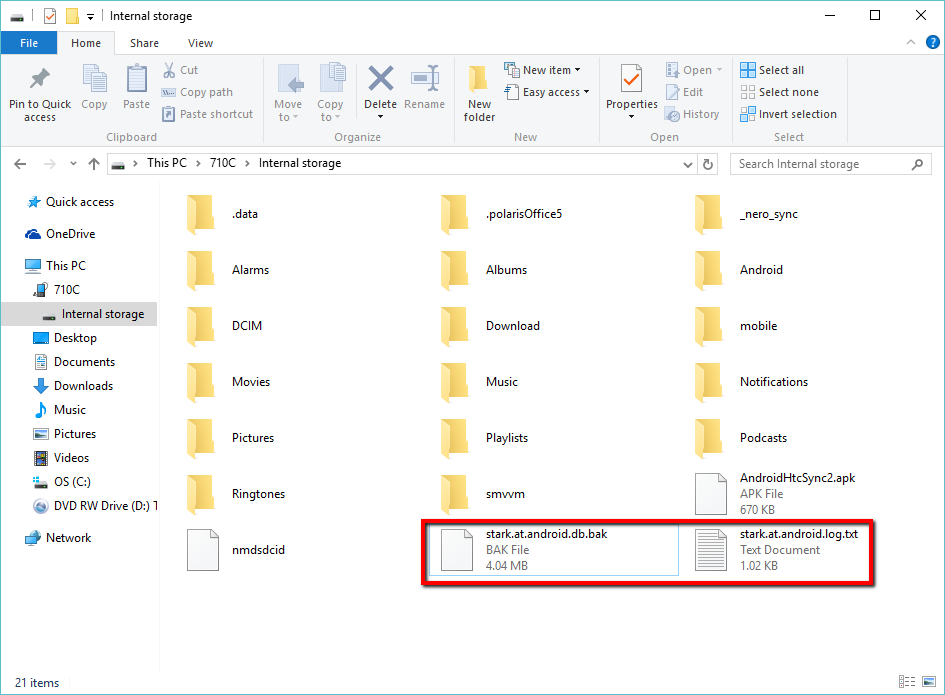
Double Click on Internal storage
- Locate the stark.at.android.db.bak and the stark.at.android.log.txt files
Copy both files to the desktop and email to a Stark team member
Connecting the Android Device to WiFi:
From the home screen, click on the settings gear icon.
- Select Wifi from the menu.
- Select the network to connect. Enter in the password.
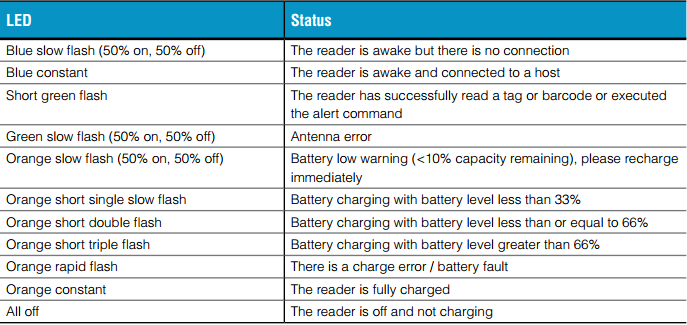
Understanding Battery Level Lights:
The TSL 1128 reader has bluetooth and battery level indicator lights on the both sides of the reader. These lights will give the user different levels of details concerning the device’s battery level and its connection to the HTC Android device.

Getting Started:
Launching Stark AT Application:
To launch select the application icon on the home screen.
Connecting the Android Device to the UHF Reader:
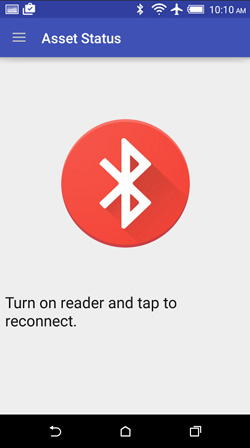
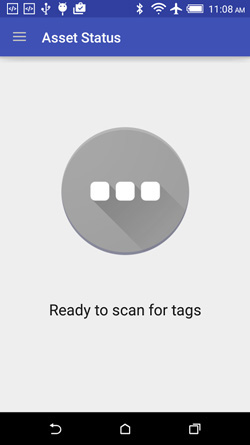
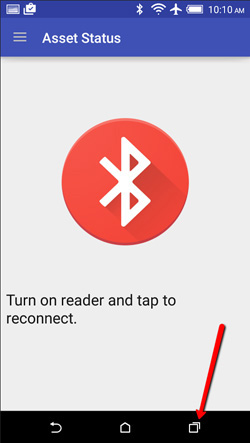
Before logging into Stark AT, pull the trigger of the handheld to make sure the device is powered on After logging into Stark AT, the user may need to connect the device via bluetooth:Tap the screen on the red reconnect icon
- Once the reader is connected, the user will see "Ready to scan for tags" displayed on the screen
New Features Related to Android:
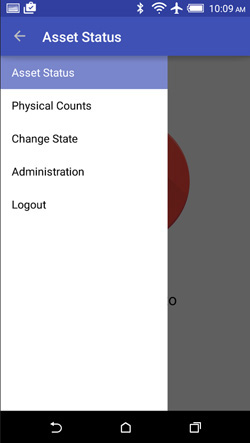
Menu Navigation
The user may easily navigate to asset status, physical count, change state, and administration functionality by tapping the menu bar in the upper land hand corner of the application
- Asset Status: Change State and Maintenece Record
After scanning a tag on the asset status screen, the user must press the task button in the upper right hand corner. This will present them with the change state and add Maintenance record functionality
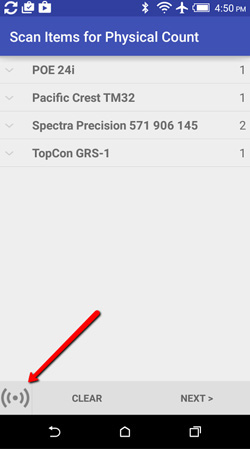
Change Power Level During Physical Count or Change State Scan
The user has the ability to change the power level of the handheld during a physical count or change state scan. This can be performed by tapping the RF power button on the bottom level corner of the screen. The user will be presented with a popover allowing them to change the power level. Min=10 and Max=29. This change in power will apply across all functionality of the handheld until the user changes it again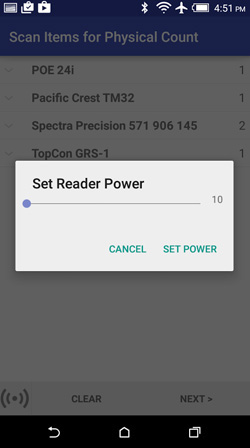
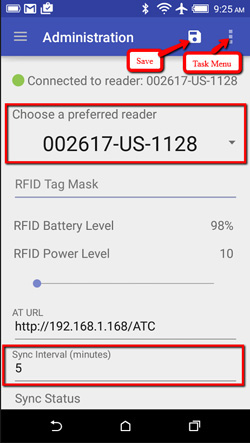
Administration Page Most of the functionality on this page is similar to the current handheld software. In addition to all current handheld functionality, the user may also perform the following on the administration page:
- Change the reader that the AT application is associated to
- The user must utilize the drop menu, "Choose a preferred reader"
- The readers are called out by their respective serial numbers
- Change the sync interval
- This value refers to the amount of time between each auto-sync
- Sync every 5 minutes is the default value
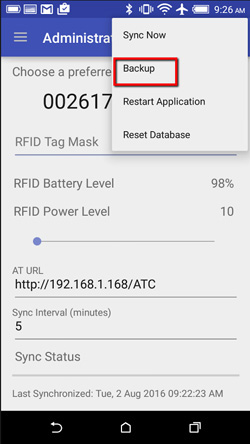
- Create a backup of the database and save Log files
- Tap the task menu in the upper land hand corner of the application
- Select "Backup"
- Follow instructions located at the beginning of this document under "How to pull files off of the Android device"
Note: After making changes on the administration menu, please make sure to use the disk icon to save all settings
- Change the reader that the AT application is associated to
Checking the Status of Asset
- Click on "Asset Status" from the main menu
Scan the asset tag of an item. The user will be presented with a screen similar to this one:
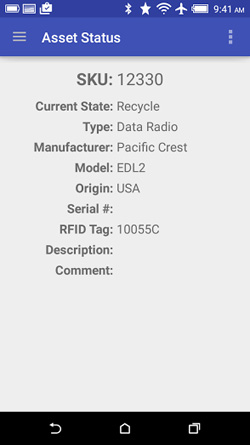
- This screen gives the user all the information about the item scanned
- To scan another item, simply pull the trigger and the handheld will automatically display information about a different asset
- To return to the main menu, click the "menu" navigation button in the top left corner
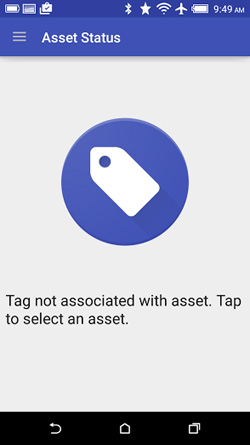
Assigning an RFID tag to an Asset
An unassigned RFID tag may be assigned to an asset using the handheld using the following method:
- From the main menu, select "Asset Status"
- Scan an RFID tag that is not already associated with an asset
The page below will be displayed. Click on the tag in the center to assign a tag. The user can search for an asset by SKU or other identifiers and must input at least 3 characters for the list to populate
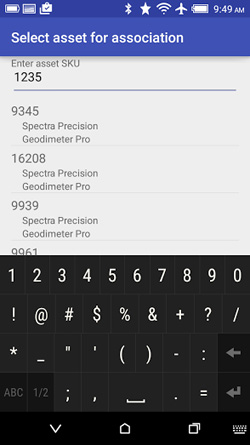
- Highlight the correct asset and then confirm the change
- The updated information regarding the asset and tag will be displayed
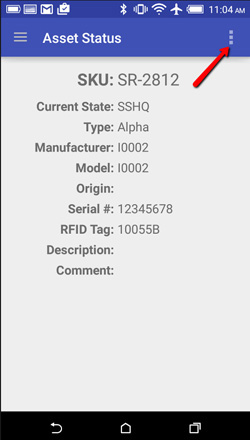
Changing the State of an Asset
An Asset's state may be changed two different ways. The first is utilized when the user wants to change the state of only one asset
- From the main menu, select "Asset Status"
- Scan the desired asset whose state you would like to change
Click on the dropdown menu in the top right corner and select change state as shown below:
- Type in the name of the desired state change and select it
- An add comment text box will appear, but you may skip this step by hitting next if desired
- Confirm the state change and the new information for the asset will be displayed
To change multiple assets into the same state proceed with the following:
- From the main menu, select "Change State"
Scan the group of assets in from of you. Your screen should look similar to the one below:
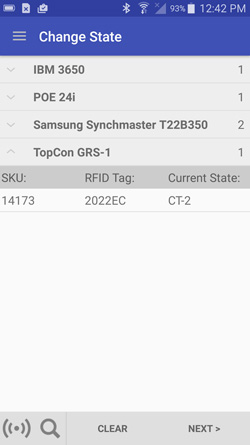
- If you are picking up too many or too few assets, you may want to adjust the power settings by using the button in the bottom left hand corner
- After scanning your assets, the search button will allow you to filter the assets by many different identifiers including SKU, RFID Tag, and Current State
Maintenance Record
To perform a Maintenance Record:
- From the main menu, select "Asset Status"
- Scan the asset
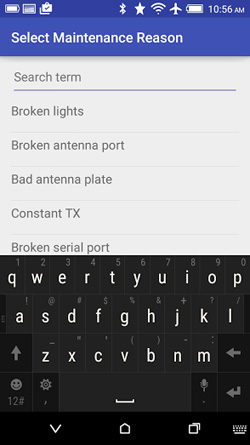
- Select "Maintenance Record" in the drop down menu at the top right corner. Note: If an Item type does not have a Maintenance reason created in the web console then Maintenance Record will not appear in the drop down menu
The user will be presented with a screen that allows input of a reason for the record. Select the reason for the maintenance record and then add a comment if you wish. Note: The reason for the record is imported from the web console as previously stated
- Finally, you will be prompted to make a state change if you desire and then you may confirm the maintenance record
Physical Counts
To perform a physical count from the handheld:
- From the main menu, select "Physical Counts"
- On the next screen, please choose the desired state from the drop down menu to either begin a new physical count or continue an existing physical count. Note: If you choose an existing physical count, skip to step 5
- Click on the plus button at the top right of the screen to begin a new physical count
- Give the physical count a name then click "Next". Note: The name will default to the current date and time
Using the handheld, scan RFID tags that need to be counted
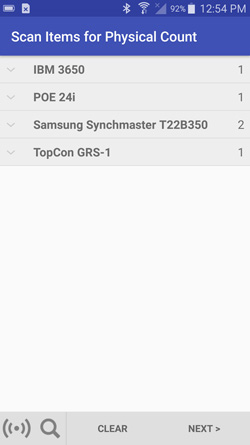
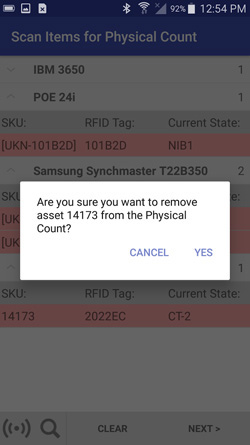
- When scanning is complete, you may filter and remove unwanted assets by clicking the search icon and long pressing on an asset, respectively
- Click "Next" to move to the summary page
- This page is a summary of all assets scanned. After verifying that this page is correct, click "Submit" to upload the assets to the physical count.
- Repeat as neccessary
After Submitting a Physical Count Using the Handheld:
On the Web Console, navigate to states>[select desired state]>select physical counts tab>[select desired physical count]
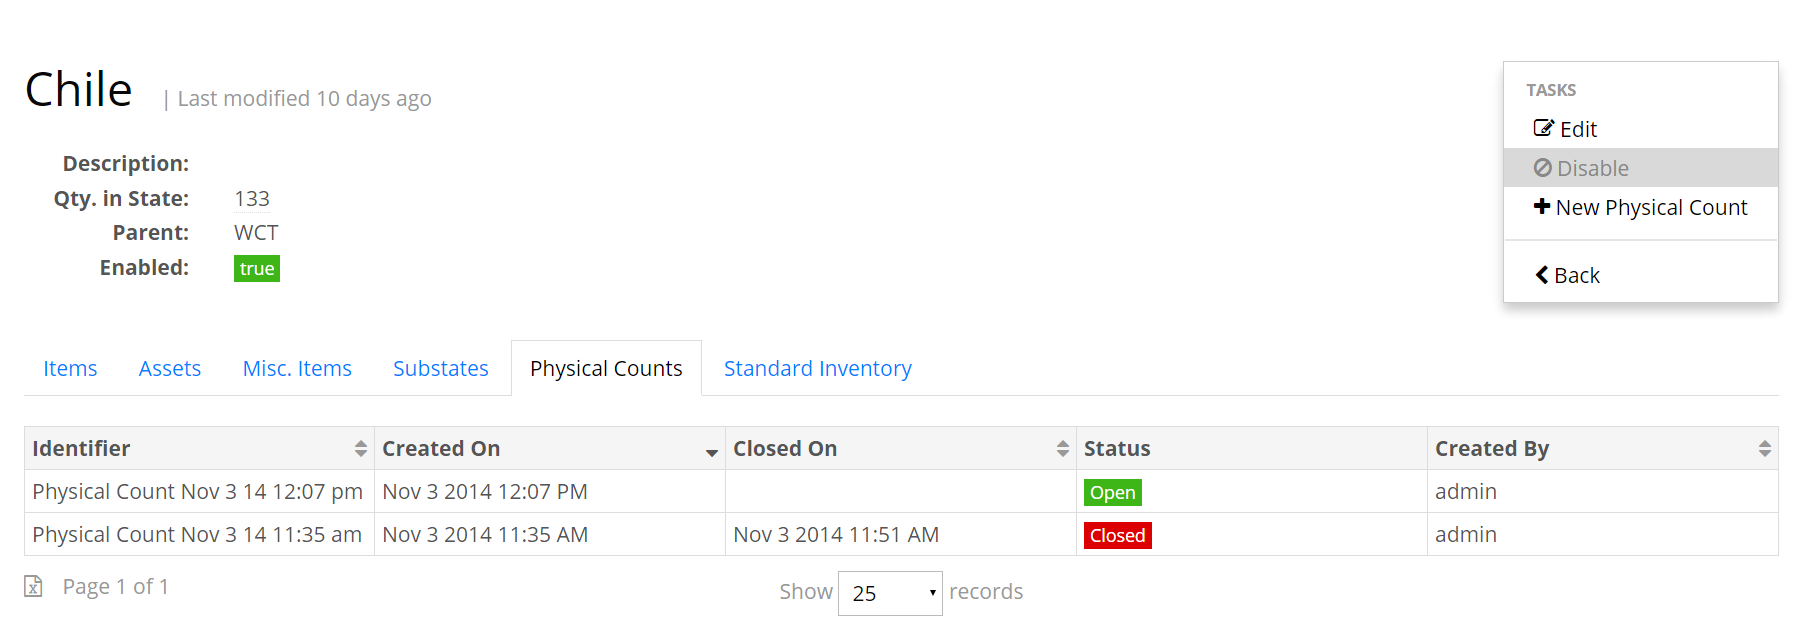
This next screen will show a counted/expected/variance list

- The user can manually input the counted value here to bypass an RFID scan
- For miscellaneous items that are not tagged, the user must manually input the counted value on this screen
- Note: The miscellaneous items expected value is pulled from the standard iinventory. If a miscellaneous item exists under the miscellaneous items tab of a state's page AND does not exist in the standard inventory, then the expected value will be pulled from the miscellaneous items tab of a state's page. When the counted field is updated for a miscellaneous item, the value will be updated immediately in the miscellaneous items tab of a state's page.
- The user can input comments on this page for individual assets by clicking the blue comment icon to the right of an asset's SKU. These comments can be viewed by hovering the cursor over the blue comment icon
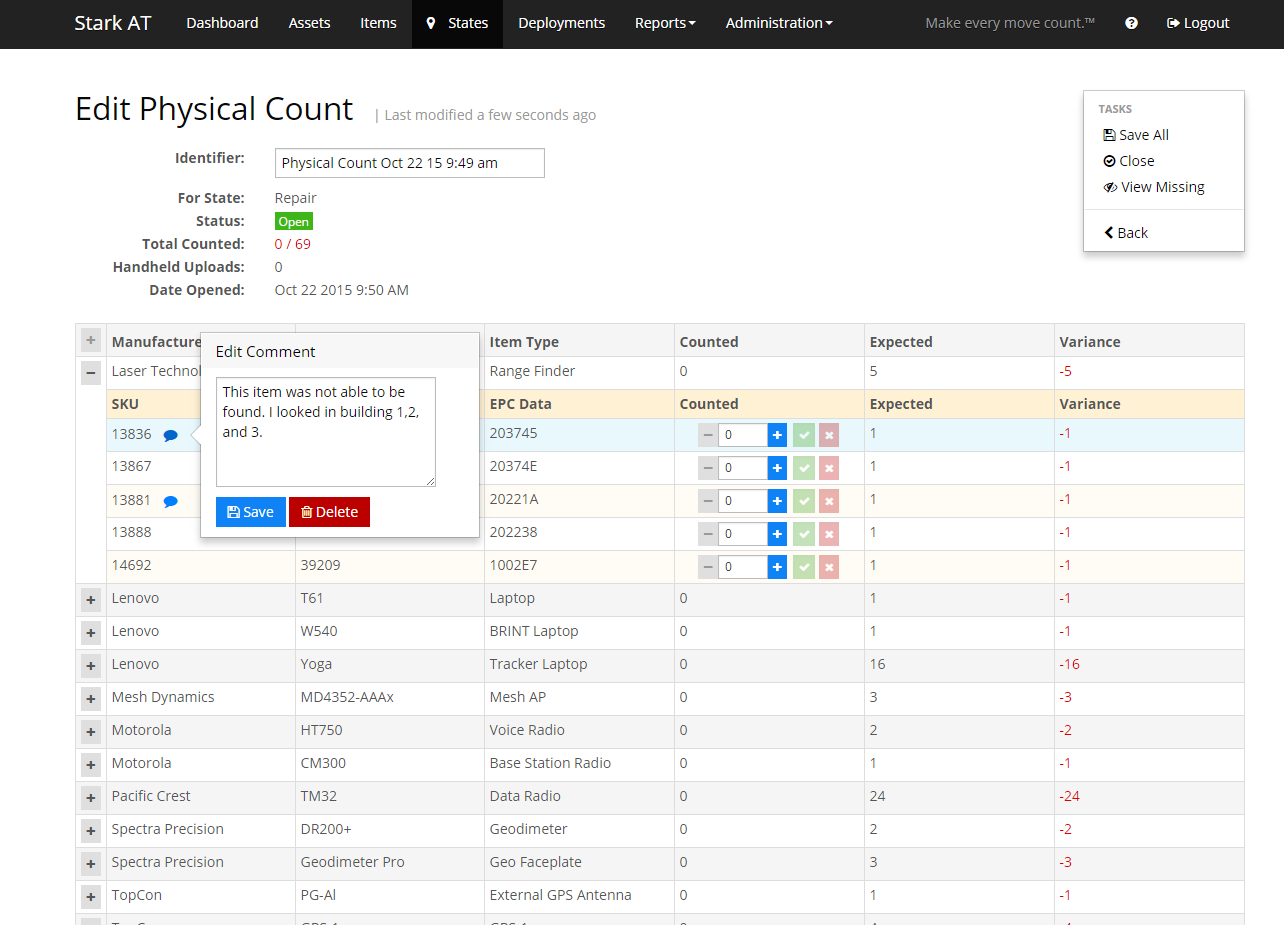
- Under "tasks", click on "view missing". This will show which items were not scanned during a physical count
- To close a physical count, select "close" under the taskbar. Note: After a physical count is closed, it can be viewed but not edited
- After closing a physical count, the following can be performed:
- View missing assets
- Move all missing assets to "missing" state
- Create a Replenishment Deployment
- This type of deployment means that the truck is missing items from standard inventory
- Example: Truck 1's physical count had 3 missing radios. It needs a replenishment deployment from HQ
- Create a Return Deployment
- This type of deployment means that the truck had excess items in inventory
- Example: Truck 1's physical count revealed that there were 5 extra laptops onboard. These laptops should be returned to HQ. A return deployment should be created
To create a deployment:
- Select a physical count that has been closed
- From the "Edit Physical Counts" screen, select "Create Deployments"
- Select the desired tab (Return or Replenishment)
- Give the name and description of the deployment
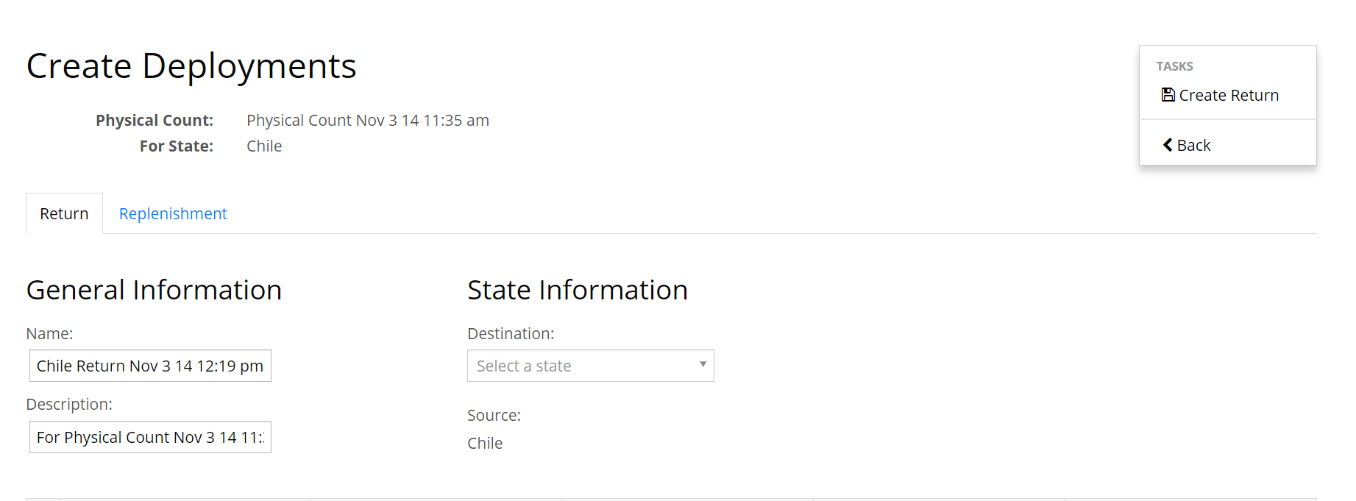
- Select a destination state
- Select "Create Return/Replenishment"
Additional Notes on Physical Counts
- Physical counts can be created from the handheld and uploaded to the web console OR
- Physical counts can be created from the web console and downloaded to the handhelds
- A short period of time will need to be allowed to assure the sync between the handheld and web console occurs (Around 10 seconds)
- After physical counts are submitted, the state of ever asset that was counted will update to the state of the physical count
- Physical counts will not include archived assets
While scanning assets during a physical count, assets that are not currently in the state being counted are highlighted with a subtle red background
- A button was added to the bottom of the screen that displays a magnifying glass. Clicking this causes a search box to slide down from the top of the screen. Tapping on the same magnifying glass button again will hide the search box
- Any keywords entered in the search box will filter the already scanned assets
- Tapping on the smaller magnifying glass icon beside the search box will toggle the "Current State Filter" mode (indicated by the exlamation mark icon that replaces the magnifying glass icon). This will prefill the search box with the current state being counted, disable further text entry, and alter the filtering logic to only display scanned assets that are not currently in the state being counted. Tapping the exclamation mark icon or closing the search box will toggle the search box back to traditional search mode
Long pressing on an asset triggers a pop up dialog confirming that the user wants to remove the selected asset from the physical count
Performing a Full Reset/Synchronization
To perform a full reset/synchronization:
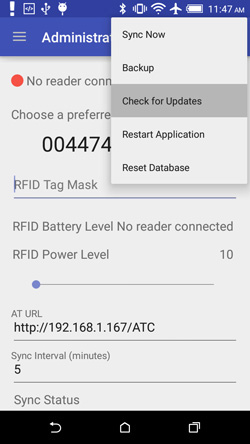
- Select "Administrator" from the main menu
- Click the button at the top right of the screen to bring up options
- Select "Reset Database"
- After reading the warning, select the "Reset" button at the bottom right
- All local data will be erased and then AT will perform a full synchronization with AT Core after entering the proper URL
Syncing
AT Mobile defaults to using Auto Sync, which means that the application will automatically sync with the server every 5 minutes. This time may be adjusted on the admistration page. Setting the time to 0 will turn off the auto-sync functionality
Note: AT Mobile will still sync after certain tasks are completed such as changing the state of an asset, submitting assets to a physical count, and adding a maintenance return
Note: A force sync may always be performed by clicking "Sync Now" under the administration page's top right menu
Installing Updates
You can update AT for Android by using the following procedure:
- Log in and navigate to the Administration screen
On the upper right hand menu, choose "Check for Updates"
If an update is available, you will see a screen containing the current software version installed on your device, the new version available for download, and release notes if available. Tap "Update Now" to begin installing the update

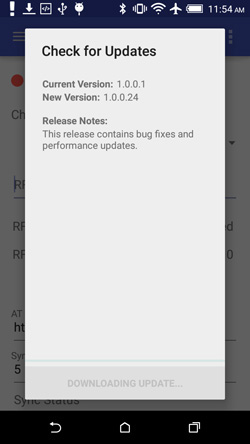
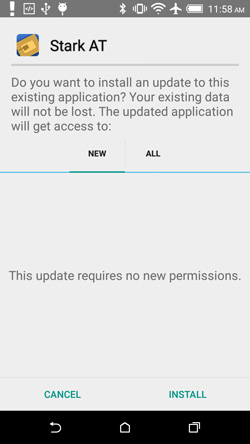
When the update is done downloading, you will be prompted to install it. Tap "Install"
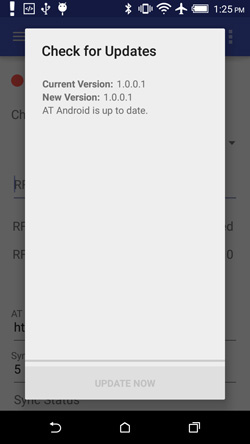
If the software is up to date, you will be informed, and can close out of the dialog using Android's back button
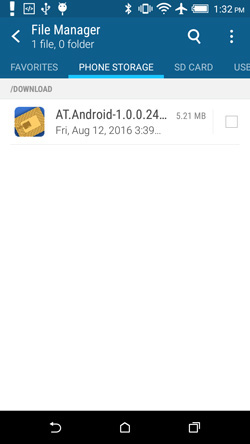
Note: When the update is downloaded, it is also accessible from the phone's File Manager application.
- Navigate to the /Download folder to find the Android APK file.
- This is useful if you want to manually uninstall and reinstall the application
Troubleshooting:
The application will not connect to the UHF reader
Relaunch the application
- Tap the window button at the bottom right corner of the device:
- This will display a list of programs currently running on the device
- Close out all programs by tapping the "X" in the upper right corner for each one
- Refer to the "Getting Started" section to launch the Stark AT program again